Okay so to continue to improve your skills in Photoshop you must consistently look for tutorials to figure out intricate and basic processes anyone can achieve in Photoshop. This tutorial is for beginners, it is meant to show you how to select an image with precision using the pen tool rather than the magic wand tool or eraser.
 |
| Step 1: Select Pen tool |
Step 1: Open Photoshop and select the Pen tool (left hand side). It doesn't matter what photo you use to practice on but an image with few sharp corners makes it very easy to select. First you will click on your image (using the pen tool) starting from one corner and begin tracing around the image's contour.
 |
| Pen tool enlarged |
To the left is an enlarged view of the tool you will be selecting:
 |
| Step 2: Select contour of image. |
Step 2: In this image I used a blue brush to show you the highlighted area. The pen tool has anchor points that allows you to curve your selection. On a PC to edit the anchor points you hold CTRL while selecting the anchor. Try this out a few times and if you make a mistake don't restart just press CTRL + Z to undo your last point selection. Make sure you complete the selection by connecting the starting point to the ending point.
 |
| Step 3: Feather radius |
Step 3: Once you've made your selection right click and select (make selection). This will bring up a menu that asks whether you are interested in a feather radius. Feathers are amazing when it comes to photo's that don't have clean contours. For this image I selected a radius of 5. This essentially deletes any problems around the contour and fades the image into the background a lot better. Depending on the size of the image you should decrease or increase the feather radius. Once you've determined the feather radius click OK. If the selection is incorrect press CTRL + Z and try again.
 |
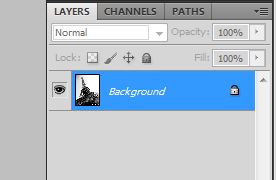
| Step 4: Creating the PSD |
Step 4: Now that you've selected the object. Right click and select inverse. Ensure that the layer is unlocked and simply press delete. This will leave you with the object alone with no background. You can then save this as a PSD and place in another image or upload online as a PSD for others to download. If you save this file as a JPEG it will automatically fill the deleted area with white space.
 |
| Step 5: Duplicating the laye |
Step 5 (advanced): To improve the image resolution while keeping the PSD intact I always find that if you select the layer, right click and select duplicate layer this will copy the original layer. Then it is very important to select layer options directly underneath the layer options. For this image I selected Overlay, which makes the image darker and more pronounced. Also you can choose to change the opacity of the layer.
 |
| Step 6: Burn the image to your liking |
Step 6: Now to get into final details I selected the Burn Tool (presented in the photo to the left. The burn tool darkens the image and makes the image more pronounced. You can select the opacity, size and shape of the tool so darken the image according to your liking.
So if you have any questions just post below and I can probably answer them. I will be running through small tutorials as I continue to post information on my blog.


No comments:
Post a Comment